Thursday 15 November 2018

Aloo Kulcha


                                                      Aloo Kulcha


       From the time we visited Amritsar back in 2016, my son has been asking for this aloo kulcha. He happened to taste from the famous "Kulwanthsingh Kulcha" near the golden temple. He says "Punjab - the food heaven", he likes no.. no... he loves Punjabi food be it kulcha or paratha or naan or any subzi's. 
       He had buttery aloo kulcha with chole masala for breakfast at the food outlet. So i tried to replicate the flaky, buttery, yet very soft kulcha. I passed my son's quality test. So i am confident in posting the recipe.

Preparation Time: 10 minutes
Resting Time: 30 minutes
Cooking Time: 5 to 7 minutes per kulcha and 30 minutes for aloo filling

Ingredients:
All purpose flour or maida: 2 cups
Butter: 50 gs to 75 gms
Water: as needed
Salt as per taste
Curd well beaten: 1/2 cup

For Filling:
Big boiled potato: 3 nos
Finely chopped onions: 1 no
Green chilli finely chopped: 1 no
Ginger: 1 inch piece
Coriander leaves (Finley chopped): 1 teaspoon 
Salt as per taste
Oil: 2 tea spoons
Jeera powder: 1/2 teaspoon 
Turmeric powder: 1 teaspoon
Garam masala: 1 teaspoon

Method:

For Stuffing:

1. Pressure cook the potatoes for 5 to 6 whistles and when the pressure  subsides, take the potatoes out and cool it to room temperature. Mash it well.
2. Finely chopp the onions, green chillies, coriander, ginger and keep it ready.
3. Place a pan and add 1 teaspoon of oil and heat it. When it is hot, add chilies, ginger and onions and fry till onions caramelize. Now add the mashed potatoes and mix well.
4. Add cumin or jeera powder 1/2 teaspoon, turmeric powder and garam masala. Mix thoroughly and add the remaining oil and mix well.  
5. When all the ingredients are mixed up, put off the flame and let it cool to room temperature.

For Kulcha:

1. Take a wide bowl, add the maida, 25 gms of butter, 1/2 cup of beaten curd, salt and mix well. 
2. Sprinkle water and knead it well to soft dough. Let it rest for 30 minutes. 
3. After 30 minutes, take the dough and divide it into equal parts (Lemon sized balls).  
4. In the meantime make the stuffing into lemon sized balls and keep it ready. 
5. Take the dough ball and roll it into round disc and smear 1/2 teaspoon butter and then fold it back to lemon sized ball, likewise make all the dough and keep it ready.
6. Now take the buttered ball and roll out into small disc and place the stuffing in the center.
7. Lift from one end of the edge and start pleating and folding and forming the pleats one by one towards the end. Join the pleats in the center and slightly flatten it. 
8. Like wise make all the kulcha"s. 
9. Now roll it into chapathi carefully.
10. Place a tawa on the stove over a high flame, put the kulcha and apply butter or oil over it. Cook it,till small brown spots began to appear, cook it on both the sides, till appears flaky. 
11. Take it out and slightly crumble it between your hands. Serve it hot with punjabi chole masala, pickle and with dollop of butter over the kulcha.


Note:
1. The stuffing can be from panner or cauliflower or aloo.
2. Kulcha's are made using maida and lots of butter. If you are diet conscious, relish this dish once in a year during winter.
3. For the chole masala i have already posted the recipe previously.

Saturday 10 November 2018

Pirandai Thuvayal


                                                     Pirandai Thuvayal


            The "Pirandai" belongs to the creeper variety, it has a lot of medicinal uses, it soother ulcer, indigestion. Usually pirandai thuvayal is served during festive lunches.
            I happened to taste this pirandai thuvayal at my husband's cousin's house, they made this for their Father's "Devashom" ( Death anniversary). So i thought it has to be made only for devashom. Later when talking to my friends, they said it is not so and consumed regularly.
           So after that I started making pirandai thuvayal regularly ie, 10 days once. This pirandai is favorite for my nephew. He likes it very much that he refuses to share this thuvayal with anyone. Cleaning the pirandai is very trickish, one has to discard the nodes & take of the vines as we do for french beans. But before all  this apply sesame oil generously on your palms and do, otherwise the pirandai may cause persistent itching in your palms, which may last for a day. 

Preparation Time: 1/2 an hour
Cooking Time: 20 minutes
Grinding Time: 5 minutes
Yields: Serves 4

Ingredients:

Pirandai Stems: 3" inch piece 4 to 5 nos
Urad dhall: Equal portion to pirandai or may be 1 tablespoon
Tamarind: Gooseberry or Marble sized ball (as per you)
Coconut: 1/2 tablespoon of tiny pieces
Red chilli: 2 to 3 nos
Salt as per taste
Sesame Oil: 1 tablespoon 

Method:

1. Apply sesame oil generously on your palms before cleaning pirandai. Cut all the nodes and discard it.
2. Remove the thread-like structure from the sides of the stem, as we do for broad-beans or french beans.
3. Cut into small pieces and wash it well. Pat it dry using soft cloth.
4. Cut the coconut kernel into tiny pieces and keep it aside.
5. Place a heavy bottomed pan or kadai on the stove over a medium flame.
6. Pour 1 tablespoon of sesame oil into the pan and heat it.
7. When the oil is hot, add the pirandai and fry it till it becomes brown and crisp. Drain excess oil.
8. Take it out of the pan and place it in a plate to cool.
9. In the same remaining oil fry the urad dhal till it becomes golden brown and  nice aroma comes out.
10. Place it in the same plate to cool.
11. Now add coconut pieces and fry till becomes golden brown and place it on the same plate to cool.
12. In the same pan fry the tamarind and red chilles for less than a minute. Place on the plate to cool, add salt as per your taste.


13. When everything has cooled down completely, grind it a mixie jar to a fine paste. Sprinkling  water in between.
14. It should be very thicky.
15. Place a small pan over the stove on a medium flame, add sesame oil and heat it.
16. When it is hot, add mustard seeds and allow it to splutter and  a few curry leaves.
17. Add this tempering to the pirandai thuvayal, mix it well.
18. Serve it along with hot rice. 
19. Stays well for a week, when refrigerated.


Note:

1. The quantity of tamarind depends on your taste, some may like it sour, while others may not.
2. Fry the pirandai to golden brown and crisp, otherwise it may cause you an  itchy-tongue.
 

Wednesday 24 October 2018

Pavakkai Chips (Bitter-guard Chips)


                                 Pavakkai Chips (Bitter-guard Chips)


       Many desist eating bitter-guard, because of its bitterness. Elders in the family often tell us it is very good for health. This bitter-guard is my "FIL's" (father-in-law) favorite vegetable, i used to wonder how a person would love, a thing which is very bitter. But he says you should enjoy or eat a vegetable as it comes in nature.

Ingredients:                                                                  Preparation Time: 10 Minutes
Bitter-guard: 2 Nos , big ones                                          Resting Time: 10 Minutes
Rice flour: 1 tablespoon                                                  Cooking Time: 20 Minutes
Besan flour: 2 table spoons                                             Yields: Serves 4
Chilli powder: 1/2 teaspoon 
Garam masala:  1/2 teaspoon
Ginger Garlic paste: 1 teaspoon (Optional)
Salt as per taste
Water for sprinkling
Oil for frying

Method:
1. Wash bitter-guard well and dry it using a soft cloth.
2. Cut the vegetable into thin roundels, discarding the seeds.
3. Smear salt over the bitter-guard roundels and rest it for 20 minutes in a bowl.
4. Now take the roundels and squeeze the extra water. Put it into bowl.
5. Add chilli powder, garam masala, ginger garlic paste, besan flour & rice flour to the bitter-guard. Add salt as per taste.
6. Sprinkle very little water so that the flour and masalas coat well over the bitter-guard.
7. Heat oil in a heavy bottomed pan over a medium flame, when the oil is hot, fry in batches.
8. Fry it till golden brown and drain excess oil and keep.
9. When it is cooled completely, store it in a air tight container.


Note:
1. Stays well for a week.
2. Smearing salt to bitter-guard before frying takes away the bitterness and makes it less bitter.
 

Saturday 20 October 2018

Paal Payasam


                                    Paal Payasam


    It has been a very long time since i posted a recipe in my blog, so after a break, let me start with a sweet, that too a traditional one "Paal Payasam". This is my first try with paal payasam recipe. It came absolutely delicious, all thanks to Vidhya (my friend), who gave this recipe.

   I tasted this paal payasam when we visited her kolu, so the next day i called her to get the recipe. She was happy to share and asked me to publish in my blog.

Preparation Time: 5 minutes 
Cooking Time: 1 hour
Yield: Serves 4 

Ingredients:
Raw Rice: 3 tablespoons
Moong Dhal: 1 tablespoon
Ghee: 2 tablespoons
Jaggery: 3 & 3/4 tablespoons
Cardamon: 3 to 4 pods finely crushed or powdered
Full Cream Milk: 1/2 litre ( Boiled and Cooled)
Nutmeg: 1/4 teaspoon (Optional)
Water: 2 cups
Saffron: a few strands
Broken Cashews: a handful
Raisin: 1 teaspoon
Pacha Karporam: a pinch (Optional)

Method:
1. Wash the rice and moong dhal together well. Drain the water completely. 
2. Place a heavy bottom pan on the stove over a medium flame.
3. When the pan is hot, add the rice and moong dhal. Dry roast it till aroma comes. Put off the flame and let it cool.
4. Take a heavy bottomed thick vessel and add the roasted rice and moong dhal to it. Add 3/4 of the boiled milk and 2 cups of water. Put it over the stove on a simmer flame. Let the rice and dhal cook well.
5. When it is completely cooked, slightly smash it with a ladle, so that mixture looks like sago- balls, at this stage add saffron and cook.
6. Mix jaggery with 2 table spoons of water and heat it till it becomes frothy. Put off the flame and filter it. Add this to the payasam.
7. Let the payasam boil for 5 minutes after adding jaggery, add cardamon powder and mix well. At this time you can add either nutmeg powder or pacha karporam. I used nutmeg as i didn't have pacha karporam.
8. Heat ghee in a small kadai, add the cashews and raisins till it becomes golden brown, add these to payasam. Mix well.
9. Put off the flame and serve hot or chilled as per your choice.


Note:
1. You can always replace jaggery with sugar, I used jaggery.
2. This payasam thickens once it cools down, you can add milk to adjust the consistency.
3. Never boil more than 5 minutes after adding jaggery. If you do so, it may curdle.


Saturday 31 March 2018

Khara Prasad


                                                      Khara Prasad


         Longtime pending in my to-do list Khara Prasad, since we visited Amritsar in December, 2016, it was there in golden temple we happened to get this prasad. This is an absolute delicacy with finger-licking taste much revered.
         This is offered to devotees as prasad. This recipe is made of only four ingredients.

Cuisine: Punjabi
Preparation Time: 5 minutes
Cooking Time: 20 minutes
Yields: Serves 3 persons

Ingredients:
Sugar: 1 cup
Water: 3 cups
Ghee: 1 cup
Whole wheat flour: 1 cup

Method:

1. Put sugar in a sauce pan and add 3 cups of water. Place the sauce pan on the stove over medium flame.
2. Sugar will melt and the syrup will start to boil, Let it boil for 5 minutes.
3. Switch off the flame.
4. In the meantime, take a pan, add the entire ghee and place the pan over the stove top on a medium flame and heat it.
5. When the ghee is hot, add the whole wheat flour and fry it till the wheat flour turns brown and nice aroma comes out of it.
6. Simmer the flame and add the sugar syrup little by little to the mixture and it will splutter. Wait and mix.
7. Little by little pour the entire syrup and take caution while pouring as it may splutter
8. Mix it continuously till ghee oozes out on the top.  
9. Now the prasad is ready. 
 

Wednesday 28 March 2018

Tandoori Paneer Tikka


                                             Tandoori Paneer Tikka


              All time favorite for my son, he will never miss to order this paneer tikka either  during lunch or dinner in any Punjabi or north Indian restaurant. Bringing that smoky favour to the tikka while making at home, you need to follow certain steps. Use wire roaster on the stove top to achieve best results.

Cuisine: Punjabi
Preparation Time: 10 minutes
Resting Time: 30 minutes
Cooking Time: 5 to 7 minutes

Ingredients:
Diced capsicum: 1 no
Diced Onion: 1 no
Diced Tomato: 1 no
Cubed Paneer: 200 gms
Thick well beaten curd: 1 cup
Turmeric powder: a pinch
Jeera powder: 1 teaspoon
Chilli powder: 1/2 teaspoon
Garam masala: 1 teaspoon
Kasuri methi: 1/2 teaspoon
Ginger garlic paste: 1 teaspoon (Optional)
Salt to taste

Method:
1. Wash capsicum and tomato. Peel off the onion skin and dice all vegetables.
2. Wash the paneer and cut into cubes. Keep it ready.
3. Beat the thick curd well and add, turmeric powder, chilli powder, kasuri methi, garam masala, salt and mix well.
4. To this curd mixture add capsicum, onion, tomatoes and paneer. Mix well so that it coats evenly over the veggie and paneer.
5. Let the marination stay for 30 minutes.
6. Grill it in a wire roaster on the stove top over medium flame on a small burner.
7. Brush little oil and turn it from time to time.
8. When done remove it and serve it hot with green chutney.


For Green Chutney:
  1/4 cup pudina tightly packed, 1/4 cup coriander tightly packed, salt, 1 no of green chilli and 1/4 cup beaten curd, 1/2 teaspoon chat masala. Blend the above ingredients in a mixie jar and the green chutney is ready.

Note:
1. Make sure to use fresh and thick curd or else it may be watery and sour.
2. When you grill using wire roaster, fire directly touches the veggies and paneer giving it the smoky flavor. ie, tandoori touch.
3. Adding ginger garlic paste is optional.


Saturday 24 March 2018

Kozhukkatai


                                                         Kozhukkatai


             It is a South Indian sweet, associated with Vinayaka Chathurthi. Mythology refers this as the favorite sweet of Lord Ganesha. But to me, it is a healthy non fried dish, so I used to make this for my son as an after school snack. The name of this dish varies with its shape like semicircular ones as kozhukkatai and inverted cones as modakams.

Cuisine: Indian
Preparation Rime: 15 minutes
Cooking Time: 5 to 7 minutes
Yields: Serves 4  

Ingredients:
Rice flour: 1 & 1/2 cup
Water: 3 cups
Salt: a pinch

For Filling:
Grated coconut: 1 cup
Jaggery: 1/2 cup or little more
Cardamon: 3 nos finely pounded

Method:
1. Sieve the rice flour and keep it.
2. Pound the jaggery well and put it in a pan and heat it, add little water and melt the jaggery.
3. Once all the jaggery is melted, filter it using a strainer and put the melted jaggery into a clean pan and place it over the stove on a medium flame.
4. Add cardamon to the jaggery and add the gated coconut to it and mix well.
5. Once the mixture becomes semi solid, put off the flame, it becomes solid once it reaches room temperature. 
6. Boil 3 cups of water in a wide bowl, add a pinch of salt and 1 teaspoon of oil. When the water is about to boil, add the sieved rice flour gently pouring it into the water and keep stirring simultaneously, so that no lumps are farmed.
7. Keep on stirring and when the mixture reaches soft dough consistency, put off the flame. Let it cool.
8. Smear ghee int your palms and take a lemon sized portion of the dough and flatten it into circle using your fingers.
9. Now place a teaspoon full of the coconut filling in the center and pleat from the sides and bring it to center and seal it, thus farming inverted cone.
10. Similarly do the modakams and for kozhukkatai, take a lemon sized ball of the dough, flatten it and place coconut filling in the center and bring one side over the other, thus forming semi-circle.
11. Likewise do it for entire dough either modhakams or kozhukkatai.
12. Place the modhakams or kozhukkatai on greased idli plates and steam it in a pressure cooker for 5 to 7 minutes until done.
13. Now soft yummy modhakam or kozhukkatai is ready.


Note:
1. Never dry roast the rice flour, if you do the kozhukkatai becomes hard and rubbery.
2. Just sieve he rice flour and use it.


Tuesday 20 March 2018

Bombay Sandwich


                                            Bombay Sandwich


             I have tasted this sandwich long back during my childhood days, my mother and I learnt  this recipe from one of her Maharastrian Colleagues. She used to make this for breakfast, she used to sandwich two bread slices with potato bajji and toast it in a tawa. My version is slightly different from hers.

Cuisine: Indian Adaptation
Preparation Time: 20 minutes 
Cooking Time: 10 minutes

Ingredients:

For Potato Bajji:
Boiled potato: 3 nos
Finely chopped onion: 2 nos
Finely chopped green chilli: 2 nos
Oil: 2 tea spoons
Sanuf: 1/2 teaspoon 
Curry leaves: a few numbers
Finely chopped coriander leves: 1 teaspoon
Salt to taste
Turmeric powder: 1/2 teaspoon

For Pudina chutney:
Pudina leaves: 1/2  bunch 
Coriander leaves: 1/4 bunch
Green chilli: 2 nos
Garlic pods: 5 to 7 (Optional)
Salt to taste

Sandwich Assembling:

Sandwich bread: 16 slices
Butter: 2 table spoons (Optional)

Method:
1. Mash the boiled potatoes well and finely chop the onions. green chillies. Keep it aside.
2. Place a pan on the stove over a medium flame and heat it.
3. When becomes hot, add 2 tea spoons of oil, saunf, green chillies and fry it for a minute, then add the onions and saute it well, till the onions become translucent.
4. Now add turmeric powder and mix well, add in the mashed potato and mix well.
5. Add salt as per taste and sprinkle little water and close it with lid. Let it cook for 2 to 3 minutes.
6. Take the lid off and sprinkle curry and coriander leaves and switch off the flame. Keep it aside and let it cool.
7. Now put all the ingredients mentioned for chutney in a mixie and grind it to a fine smooth paste. Keep it ready.
8. Now for sandwich, take a slice of bread and spread some butter over it, apply green chutney and spread some potato bajji and close it with another slice of bread.
9. Toast this sandwich in a sandwich toaster and take it out once it is done.
10. Cut it into triangular shape ans serve it hot.


Note:
1. Adding garlic to the chutney gives a fantastic taste, when toasted.
2. For variations, you can add grated cheese or cheese slices.


Thursday 15 March 2018

Pudina Thuvayal


                                            Pudina Thuvayal


           A very simple recipe, yet very tasty. My son loves to eat this mixed with hot plain white rice. The recipe can be made adding coconut or without coconut. The latter recipe stays well for about a week. But I feel the coconut version is more tastier. Here I am posting the non-coconut version.

Cuisine: South Indian
Preparation Time: 5 minutes
Cooking Time: 10 minutes
Grinding Time: 5 minutes


Ingredients:
Fresh pudina leaves: 1 cup tightly packed
Coriander leaves: 1 hand full (Optional) 
Coriander seeds: 1 tablespoon
Bengal gram + Urad dhal: 1 tablespoon
Tamarind: Marble sized ball
Red chilli: 6 nos( or less) as per taste
Salt as per taste
Water as needed
Oil: 2 tea spoons for tempering
Mustard seed: 1/4 teaspoon for tempering
Curry leaves: a few for tempering 

Method:
1. Pluck only the leaves from the pudina stem and discard the stem.
2. Wash the leaves well in running water or rinse it well in water and keep it aside. Likewise, do it for coriander leaves.
3. Place a pan on the stove and add 1/2 teaspoon of oil and heat it, add bengal gram and urad dhal. Saute it well, add in coriander seeds and saute it till aroma rises from it and turns golden brown.
4. If you are adding coconut, add in, at this stage, otherwise skip it.
5. Add tamarind, chillies and the leaves and put off the stove.
6. Let it cool down completely.
7. Grind it in a mixie jar, using very little water into a fine smooth paste.
8. Place a pan, add oil and heat it. Add mustard seeds and curry leaves and let it splutter.
9. Add this tempering to the thuvayal, mix well.
10. Taste best when mixed with plain hot white rice and with a dash of ghee.


Monday 12 March 2018

Whole Wheat Coconut Cookies in Pressure Cooker


               Whole Wheat Coconut Cookies in Pressure Cooker


            During my childhood, we used to buy coconut cookies from the nearby bakery, those cookies used to be crispy on the outside, soft and chewy inside. In those days, they used to wrap it in paper bags. Sometimes, it used to be still warm, the taste still lingers in my memory.

Cuisine: Indian Adaptation
Preparation Time: 10 minutes
Resting Time: 30 minutes
Baking Time: 20 minutes 

Ingredients:
Wholewheat flour: 1 cup
Coconut Scrapping: 2 table spoons
Coconut Oil: 2 table Spoons
Boiled and Cooled Milk: 2 table spoons 
Jaggery well pounded: 1/4 cup
Baking Powder: 1/4 teaspoon
Baking Soda: a pinch
Salt: a pinch 

Method:
1. Take whole wheat flour in a wide bowl, add baking powder, baking soda and a pinch of table salt. Mix well.
2. To this add coconut scrapping,  melted and filtered jaggery and coconut oil, mix well using a spatula.
3. Sprinkle milk in between and knead it into soft dough and make it cylindrical.
4. Now wrap this dough using cling-film or with cloth and place it in refrigerator for 30 minutes.
5. In the meantime, prepare the pressure cooker for baking.
6. Place a 7.5 lit pressure cooker over the big burner on a medium flame. 
7. Add 1/2 kg of common salt and place a stand of about 3 " height and heat it, this is pre-heating for five minutes. 
8. When the cookie dough is ready after 30 minutes, take it out from refrigerator.
9. Now cut the cylindrical dough into roundels of 1.5" thickness.
10. Place it on a tray and put it inside the cooker. Close it with lid, don't forget to take the gasket out.
11. Bake it for 20 minutes, the cookies will be ready.
12. Cool it down completely on a wire rack and store it in an air tight container.


Note:
1. Never forget to remove the gasket from the cooker lid before baking.
2. These cookies may be slightly chewy. 
 

Tuesday 6 March 2018

Punjabi Aloo Ka Sabzi


                                               Punjabi Aloo Ka Sabzi


             Spicy, pipping hot potato curry served with puri's. Aloo puri is one of Delhi's most famous, favorite street food. The most irresistible breakfast dish during cold winter days. The freshly cut and sprinkled onions gives crunchy feel and the tomatoes gives tangy flavor to the dish.

Cuisine: Punjabi
Preparation Time: 15 minutes
Cooking Time: 25 minutes
Serves: 3 to 4 persons

Ingredients:
Potato: 1/4 kg
Onion: 2 nos big ones
Tomato: 2 nos big ones
Shahjeera: 1/2 teaspoon
Ginger garlic paste: 1 teaspoon
Chilli powder: 1 teaspoon
Coriander powder: 1/2 teaspoon
Garam masala: 1/2 teaspoon
Lemon Juice: 1 & 1/2 tea spoons (Optional) while serving
Turmeric powder: 1/2 teaspoon
Kasuri methi: 1 teaspoon (Finely crushed)
Salt as per taste
Water as needed
Oil: 2 to 3 tea spoons
Finely chopped Coriander leaves: 1/2 teaspoon

Method:
1. Peel the skin of the potatoes and cut it into cubes. Keep it immersed in water.
2. Finley chop the onions and tomatoes and keep it aside.
3. Take a small pressure cooker or a pan and place it over the stove on a medium flame.
4. When it is hot, add oil and add shahjeera. Let it splutter, add ginger garlic paste and saute it for 2 minutes, till the raw smell goes off.
5. Add 3/4 cup of the chopped onions and reserve the rest for garnishing.
6. When the onions becomes translucent, add the cubed potatoes. Mix well.
7. Add tomatoes, chilli powder, coriander powder, turmeric powder, garam masala and finally kasuri methi. Mix it well.
8. Add water till all the ingredients are immersed.  Add salt  and stir once and close the pressure cooker with the lid. Cook it for 5 to 7 whistles.
9. When the pressure settles down, open the cooker and sprinkle some chopped coriander leaves and transfer it to serving bowl.
10. Yummy subzi is now ready.


Thursday 8 February 2018

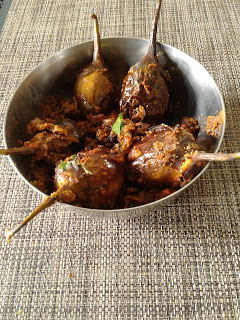
Stuffed Brinjal


                                                   Stuffed Brinjal


               Typical Andhra dish, they call it "Guthi Vankaya Kura".  It is a semi dry gravy dish,which  goes well with plain hot rice.

Cuisine: Andhra
Preparation Time: 20 minutes
Cooking Time: 25 minutes
Serves: 3 to 4 persons 

Ingredients:
Brinjal: 1/4 kg
Onion: 2 nos
Tomato: 2 nos
Salt as per taste
Oil: 3 table spoons
Water as needed

For Stuffing:
Khaskhas: 2 tea spoons
Sesame Seeds: 2 tea spoons
Redd chilli: 4 nos
Tamarind: a marble size
Peanuts: 2 tea spoons

Method:
1. Wash the brinjals well and cut in one end and stalk intact and immerse it in water. Chop the onions and keep. 
2. Dry roast sesame seeds, khaskhas and groundnut one by one and in thee end slightly toss the red chillies and tamarind.
3. Grind the roasted ingredients into coarse paste or powder.
4. Gently stuff the powder in the slits of the brinjal and keep it aside. 
5. Place a pan and pour 1 tablespoon of oil and heat it.
6. Place the stuffed brinjals in the pan and toss it till the brinjal changes its colour to light brown.
7. Take it out and keep aside.
8. In the same pan, add the chopped onions and saute till it becomes translucent.
9. Add the chopped tomatoes and cook till it reaches mushy consistency. 
10. Now add the tossed brinjal and saute it. Sprinkle some water and let it cook for 5 to 7 minutes.
11. Pour oil in between and wait till all the oil floats on the top.
12. Switch off and transfer it to a serving bowl.
13. Serve it hot with plain hot rice or as side dish to any rice. 


Tuesday 6 February 2018

Dahi Papdi Chaat


                                                    Dahi Papdi Chaat

            Dahi- Curd or Yogurt, papdi- crispy fried wafer using maida.It is traditional street food, very famous in North India. Its a mouth-watering snack, where in a single bite you can enjoy various tastes like sweetness, sourness, spiciness, etc and the chilled yogurt. 
            Dahi papdi chat is favorite for my husband and y nephew. I made this chaat several times, now after many experiments, I am posting it in my blog.

Cuisine: North Indian Chaats
Preparation Time: 15 minutes
Cooking Time: 20 minutes 

Ingredients:

For Papdi:
Maida: 1 cup
Cheroti rava: 1 tablespoon
Salt: as per taste
Ajwain: a pinch
water as needed
Oil for frying

For Chaat:
Boiled Potato: 2 nos
Onions finely chopped: 1 no
Chaat masala: 1 teaspoon
Tamarind chutney: 2 tea spoons
Mint chutney: 2 table spoons
Well beaten curd: 1 cup
Sev or Ompodi: 2 table spoons (Optional)
Coriander leaves finely chopped: 2 tea spoons (Optional) 

Method:
1. Take 1 cup of maida in a wide bowl, add cheroti rava, salt, ajwain and mix well.
2. Sprinkle water little by little and knead it into soft dough. Let it rest for 5 minutes.
3. Take a marble sized portion of the dough and roll out into thin papdi's, prick it with fork, so that it will not puff while frying.
4. Place a kadai on the stove and heat enough for frying.
5. Heat oil over medium flame, when the oil is hot, drop in papdi's 3 to 4 at a time. 
6. Fry till it becomes golden brown, drain excess oil and take it out.
7. Cool it completely and store it in a air tight container. 
8. Noe boil the potatoes and mash it. Keep it ready.
9. Add chopped onions, chaat masala t the mashed potato and mix well.
10. Beat the curd and keep, make the chutneys and keep.

Assembling papdi chaat:
1. Take the papdi and spread the potato mixture evenly over it and add imli chutney and mint chutney. 2.Pour the beaten curd evenly over all the assembled papdi's and garnish it with sev and coriander. 3.Serve immediately.


Note:
1 Curd should be chilled ie, refrigerated.
2. I have already posted imli and green chutney recipe in my earlier posts ( Vada Pav).


Monday 5 February 2018

Beetroot Halwa


                                                      Beetroot Halwa


              Just like how carrot halwa is famous in north India, beetroot halwa is famous in tamil households.  My Mother used to prepare this for her Sister-in-law during her pregnancy, as it increases hemoglobin level.
              I learnt this recipe from my mom, to give it to my elder sister carrying her child then. My mothers recipe is simple with just three ingredients beetroot, sugar and ghee, but I add little khoa to this to add little extra taste.

Cuisine: South Indian                                                                        Ratio
Preparation Time: 10 minutes                                                Beetroot: Sugar
Cooking Time: 15 minutes                                                                 1: 1/2

Ingredients:
Grated beetroot: 2 nos or 2 cups
Sugar: 1 cup
Ghee: 1/4 cup
Crushed or Pounded Cardamom: 2 nos
Unsweetened Khoa: 2 table spoons
Cashews & Raisins: 1 table spoon (Optional)
Water: 1/4 cup

Method:
1. Clean the beetroot and peel off the skin and grate it. Keep it aside.
2. Pound the cardamoms and keep it ready.
3. Crumble the khoa and let it be in room temperature.
4. Place a pan and add 2 tea spoons of ghee and heat it, when it is hot, add the cashews and raisins and fry till it becomes golden brown.
5. To it, add the grated beetroot and saute it well till the raw flavor of beetroot goes off.
6. Add 1/4 cup of water and let it cool, when all the water is absorbed, add the sugar and cook.
7. Now ad unsweetened khoa and mix thoroughly, so that no lumps are framed.
8. Add the fried cashews and pounded cardamoms and mix well.
9. When the mixture reaches a semi-solid state, put off the flame.
10. Transfer it to serving bowl and serve it hot.


Note:
1. It may stay well for 2 to 3 days when refrigerated.
2. Taste best while hot.